New Science Building Design
By Gabriella Vasquez, Madison Brand, Copper Hochman, and Peter Nebb
The end goal of this project was to create the new science building that San Marin is planning to have finished in the year 2020. But before we could start on that, we would have to cover many other topics in this unit such as Earth's layers, Angles of the sun, Day lighting Techniques, etc. We had to learn about all these elements to properly design our building the most energy efficient as possible. We started out this unit by learning about Earth's layers and how they came to believe that there is a solid inner core. Next we covered where we are in the universe and then had to create an accurate model with specific variables. This then lead into learning about solar angles and how they change over the span of the year. Next we moved on to learning atomic structures and subatomic particles, which was definitely a brain teaser. We also covered heat and molecules in this part of the unit. This lead to learning about different day lighting techniques. We had to make a cardboard model for this and test different techniques to see for ourselves which ones were the most effective. We then as a class created a Justification Document which gave even more information on energy conservation. After learning all of this, we started to work on our building design. The following will go into even more detail on all these subjects.
ContentEarth's Layers
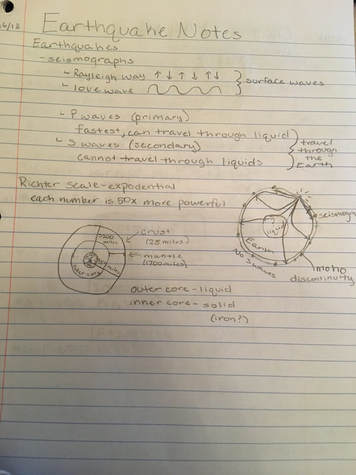
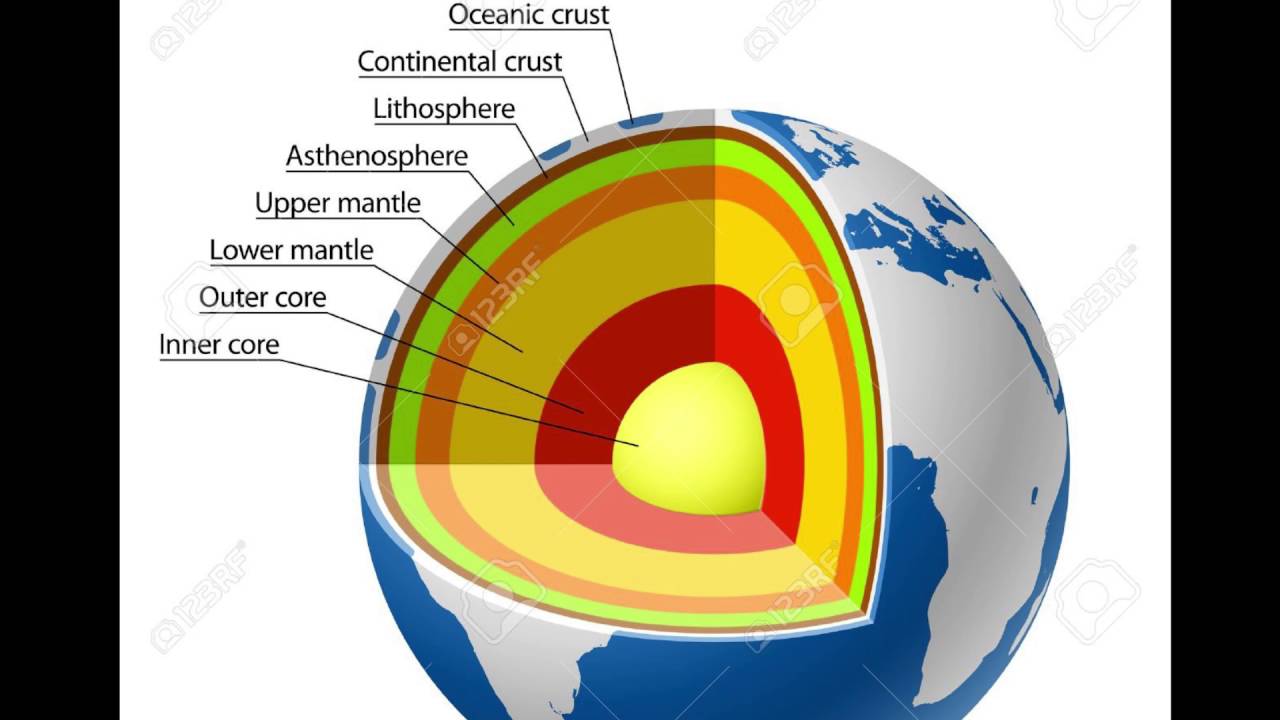
We started this out by quickly reviewing the layers in the Earth. When dissecting our planet, we start with the crust, then there's the mantle, outer core, and finally the inner core. To the right are some quick notes I took during one of the lectures. After understanding that there are many layers to the Earth and what we believe it contains, we started looking towards earthquakes. We reviewed the different types of waves and how they are read using seismographs, and then we learned about how they came to the conclusion that there is an inner core, probably a solid one. This conclusion was made because of the earthquake readings. Seismologists realized that during earthquakes, the P waves and S waves weren't showing up in straight lines across the globe, but instead seemed to be ricocheting off of something. And on the complete opposite side of the world, no waves appeared. This also inspired the idea of a solid core, because these waves cannot pass through solids. They seemed to be bounces off and changing direction, which would indicate that they are coming across something solid while traveling through the Earth. But we are not 100% positive because so far no ones been able to reach the 4,000 miles to the center of the Earth. Along with learning about these waves, we briefly went over mohorovicic discontinuity and how it affected seismic readings. We only spent one day going over all of this information, because the next day we jumped into the textbook and started learning about universal gravitation and satellite motion. But even though learning this information took a short period of time, it was still necessary to learn about how the tectonic plates worked and how earth quakes travel through the Earth when considering our new design, especially because we live in California. And once we learned about the inner parts of our world, we then started learning about the outer parts of our world; our solar system. |
|
Model of Orbits
We then started looking outside of our world and at our solar system. The point of this part of the unit was finding out how our orbit works and how it affects our planet. As stated above, we started this unit by learning about Universal Gravitation and satellite Motion. This is basically Tangential Velocity, which in an orbit, the object is moving a certain speed horizontally while simultaneously "falling" towards earth. This results in a circular path around whatever object it is orbiting; an example is the moon to the earth. And satellite motion is following the curvature of earth, and for every 8 km it moves horizontally, it moves 5 m vertically creating an orbit and tangential velocity of 8km/s.
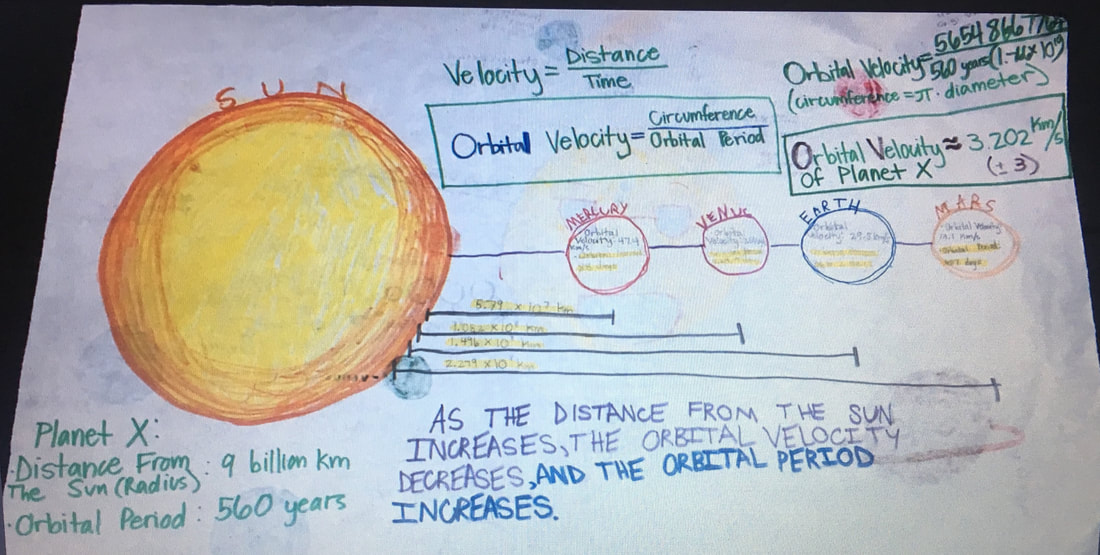
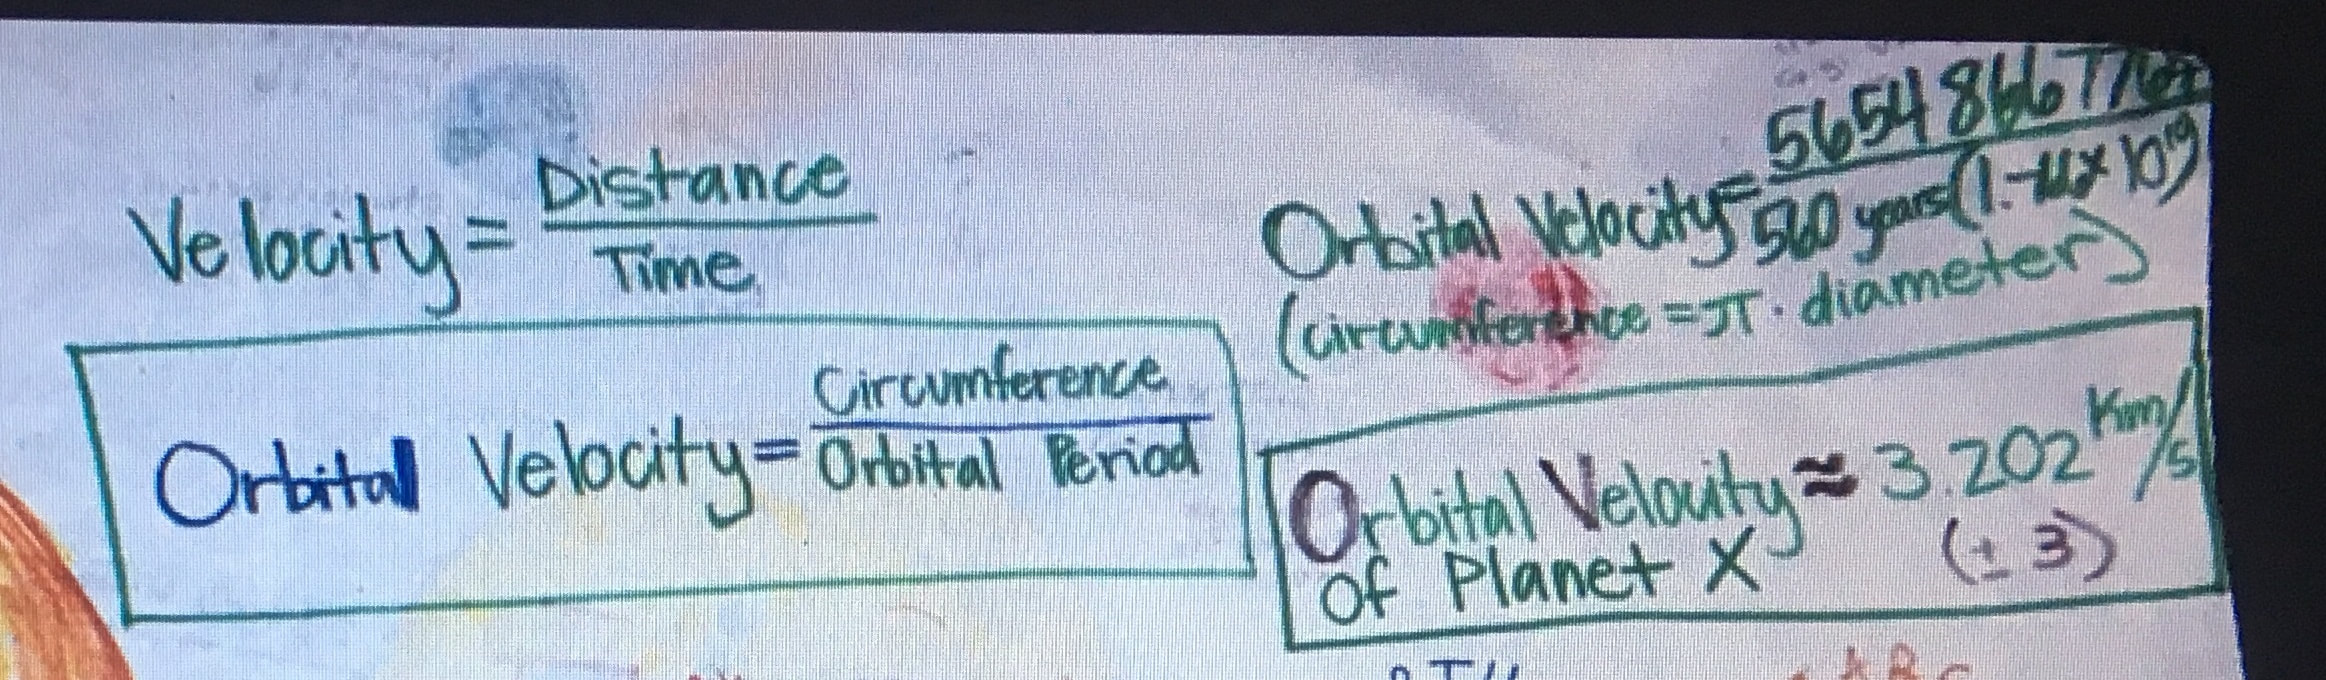
After doing more calculation practice with orbits, our next assignment was to create a model of our solar system. The first one we made, we were told to draw what knowledge we already had about our universe, and that it didn't have to be to scale. After going over basic information, we were given a link with a table with loads of information such as masses of each planet, distances between them, orbital period, etc. The second model we made had to include certain variables of our choosing, and the drawings had to be accurate based on our variables. My team and I chose to base our model on the relationship between the distance from the sun and the orbital period and velocity. The point to this project was to see if our model was accurate. This was tested by being given the information of our variables of Planet X. We were told the distance from the sun and it's orbital period, and we then had to calculate the unknown planets orbital velocity. Pictures of the model are below.
We then started looking outside of our world and at our solar system. The point of this part of the unit was finding out how our orbit works and how it affects our planet. As stated above, we started this unit by learning about Universal Gravitation and satellite Motion. This is basically Tangential Velocity, which in an orbit, the object is moving a certain speed horizontally while simultaneously "falling" towards earth. This results in a circular path around whatever object it is orbiting; an example is the moon to the earth. And satellite motion is following the curvature of earth, and for every 8 km it moves horizontally, it moves 5 m vertically creating an orbit and tangential velocity of 8km/s.
After doing more calculation practice with orbits, our next assignment was to create a model of our solar system. The first one we made, we were told to draw what knowledge we already had about our universe, and that it didn't have to be to scale. After going over basic information, we were given a link with a table with loads of information such as masses of each planet, distances between them, orbital period, etc. The second model we made had to include certain variables of our choosing, and the drawings had to be accurate based on our variables. My team and I chose to base our model on the relationship between the distance from the sun and the orbital period and velocity. The point to this project was to see if our model was accurate. This was tested by being given the information of our variables of Planet X. We were told the distance from the sun and it's orbital period, and we then had to calculate the unknown planets orbital velocity. Pictures of the model are below.
|
|
|
Solar Angles After understanding where we stand in our solar system, we started talking about solar angles. Our Earth is on a tilt and is at different distances from the sun during different parts of the year. One fact I found interesting when talking about this was that during our winter season (Northern Hemisphere), we are actually at our closest point to the sun despite the colder temperatures. We also went over how the suns angles affect our seasons and weather, why the sun will never be directly above us in Novato, why and how the sun travels on the South side during the day, and more. We didn't do any project with this, we just looked at some graphs that showed how the angles changed throughout the year and went outside to track the sun. But we had to learn this to be able to do our next mini project; our day lighting design model. And in the big picture, we needed to take into account the angles of the sun and where we get the most light when designing the science building. 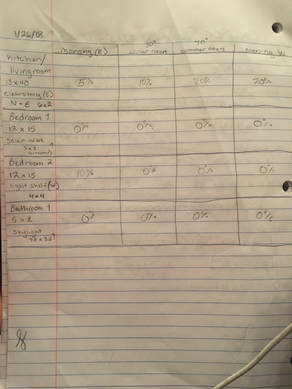
|
Day Lighting Design model The next mini project was to create a day lighting design model. We had to create a 1000 square foot house with a minimum of two bedrooms and one bath out of cardboard. We made our model to scale, and a picture can be found below. 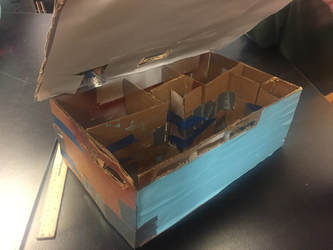
Another requirement was to have four different lighting techniques on our model. We needed to have a skylight, clerestory windows, a light shelf, and a solar tube. To isolate these variables, we had one of each day lighting technique in a different room. We then took a bright light and traced the path of the sun around our building to see how effective each technique was. We then recorded the data in percentages of how much light there was in the room. This data is shown on the left. As you can see, non of our techniques worked exceptionally well, but we decided that clerestory windows worked the best.
We did this project to gain a better understanding of the day lighting techniques that will be used in our final project. This gave us hands on knowledge of what types worked and didn't work, which is needed when designing. |
Atomic Structures
|
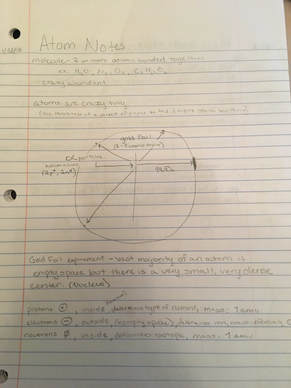
The last thing we went over before starting the new science building project was atomic structures and subatomic particles. Learning about this was definitely a brain teaser. During this two hour lecture, we went over what makes up an atom, the similarities and differences between protons, neutrons, and electrons, and how things make up our universe. Some pictures of my notes are to the left.
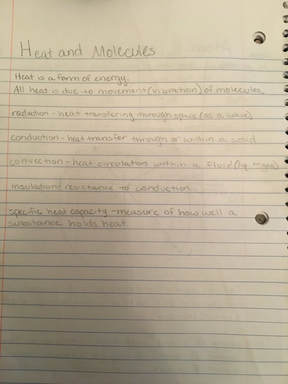
We also went over the Gold Foil Experiment. This experiment showed that a vast majority of an atom is empty space but there is a very small, very dense center (the nucleus). The first picture is explaining what is going on. The gold foil in the center is 2-3 atoms thick, and then they took a molecule and shot it through the gold foil. 99.9% of the time, the molecule passed through the gold foil and hit the same place every time, but that other 0.01% of the time it would ricochet off and hit somewhere else. This proves the above statement. When learning about atoms and how many there are and how small they are, I had to forget about the world we live in and view it in a different light. The are so many atoms that make up our universe, that it cannot be comprehended. These atoms are so small that we actually don't know their true shape, but we do know that they make up everything in our world. The reason we learned about the atomic structure was to get a better understanding of where heat comes from. Heat is the result of vibration of molecules. We also went over the different types such as radiation, conduction, convection, etc. This was important to learn so we'd be able to pick the best materials for our building to help energy consevration. |
Justification Document
The document below was a class contribution explaining how different types of energy work and why they are more beneficial. Each type such as solar power, geothermal energy, hydro power, etc. includes a quick explanation of how it works and then lists pros and cons. On the last couple pages, there are some tables and graphs representing current energy consumption and facts on climate change. We created this document to gather a better understanding of how energy is used and what sources are the best for the environment.
The document below was a class contribution explaining how different types of energy work and why they are more beneficial. Each type such as solar power, geothermal energy, hydro power, etc. includes a quick explanation of how it works and then lists pros and cons. On the last couple pages, there are some tables and graphs representing current energy consumption and facts on climate change. We created this document to gather a better understanding of how energy is used and what sources are the best for the environment.
The New Science Building
|
Our Assignment
After learning all these subjects, we started our final project. We were given a long and very specific requirements list to take into account before we began to design our building. Each science subject requires different things in the classroom, but some things needed to be added in all classrooms such as move-able furniture, sinks and cabinets, etc. Some other requirements were that there needed to be ten classrooms, enough room to fit 330 students, under 13,000 square feet, under 10 million dollars, and as energy efficient as possible. We had three weeks to create a blueprint, a 3-D model, and a five minute presentation on why our design works. To the right is the slideshow for our presentation, which also includes pictures of the blueprints and model. In our presentation, we had to include a lot of information. We had to explain our key components, why we chose this design, visibility and usability, how we met client need, lighting techniques, materials, and aesthetic along with the blueprint and model. After putting in all this work, we then had to present in front of a panel of architects to get their opinion on our work. Designing a building so big was difficult in some ways, but also fun in others. While designing, we had to remember every requirement and had to figure out a way to make everything work together. Creating something with so many possibilities, was stressful, but was also fun to have so much freedom with it. But it did take a lot of brainstorming and decision making for each little detail. |

|
Reflection
This project wasn't necessarily my favorite to do because it added a lot of stress, but overall I'm very happy with the end result. One thing that I learned during this project was how much work and time goes into designing a building. My dad is an architect and I never thought much of it until I had to create something of my own. I learned how much detail and thought goes into every aspect of the building. Another thing I learned during this project was how to create a 3-D model. I used the application "Sketch-Up", and figured out how to use each tool and give it all the details it needed. Learning how to put time and effort into each detail and how to virtually create something is definitely something that will help me in the future. One thing that I could have worked on was work ethic. Even though everything got done within the time we were given, I found myself stalling and waiting until the last minute to complete things. One more thing that I could work on in the future is leadership or assertiveness. I have definitely improved my leadership skills since the first project, but I still have difficulty sharing ideas and following through. So in the future I can keep in mind what I need to work on to be a better teammate. But all in all, I am very proud of what my team was able to create.
This project wasn't necessarily my favorite to do because it added a lot of stress, but overall I'm very happy with the end result. One thing that I learned during this project was how much work and time goes into designing a building. My dad is an architect and I never thought much of it until I had to create something of my own. I learned how much detail and thought goes into every aspect of the building. Another thing I learned during this project was how to create a 3-D model. I used the application "Sketch-Up", and figured out how to use each tool and give it all the details it needed. Learning how to put time and effort into each detail and how to virtually create something is definitely something that will help me in the future. One thing that I could have worked on was work ethic. Even though everything got done within the time we were given, I found myself stalling and waiting until the last minute to complete things. One more thing that I could work on in the future is leadership or assertiveness. I have definitely improved my leadership skills since the first project, but I still have difficulty sharing ideas and following through. So in the future I can keep in mind what I need to work on to be a better teammate. But all in all, I am very proud of what my team was able to create.
